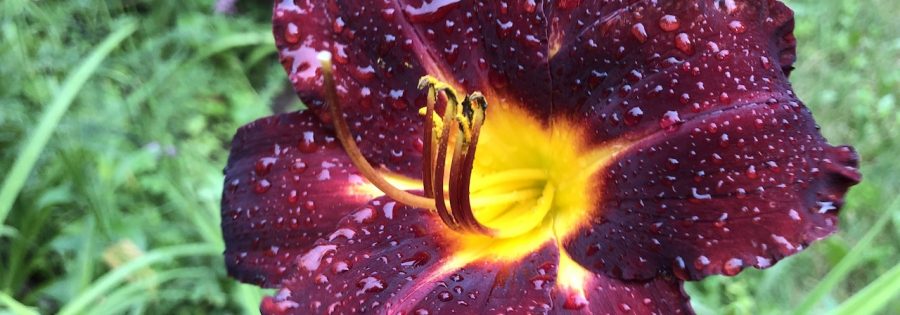
The dusky purple petals of ‘Bela Lugosi’ arise from a lime-green throat whose color bleeds into a greenish gold center. It seems to suit this Daylily’s namesake, the Hungarian actor best known for his role as Count Dracula.
Thanks to a vigorous habit, good bud count on well-branched stalks and a dark flower color that lasts well in sun, this tetraploid, mid-season bloomer has garnered awards from the American Hemerocallis Society. The slightly ruffled flowers measure about 6 inches across.
Semi-evergreen foliage never has any problems in my WI garden.
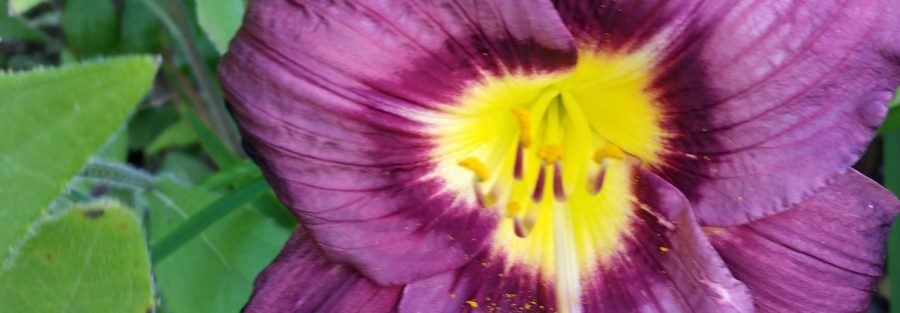
This early, midseason bloomer has an unmistakable pattern and is slightly fragrant.
It is near white with a bluish hue. The large eye zone has a dark purple border that fades to lavender closer to the chartreuse throat. There is a cream colored stripe on the mid rib and a dark purple picotee edge.
She is an Evergreen tetraploid that does fine in my zone 4 garden.
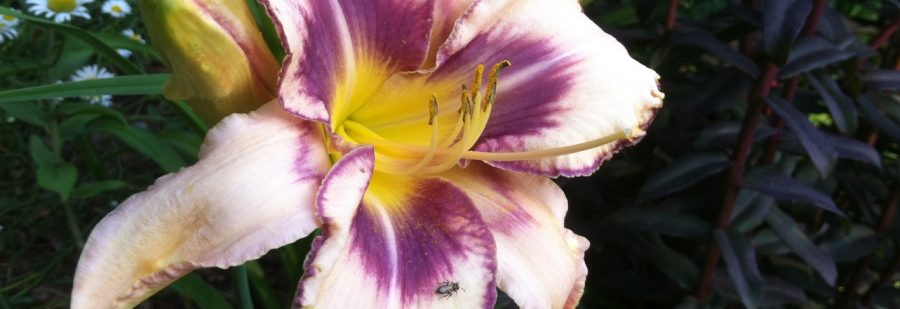
This daylily is an unregistered seedling hybridized by a friend, MJT. It is 28 inches tall with 5 inch blooms. Naturally, the color is pink panther pink and there is a cranberry eye zone and matching picotee edge above a chartreuse throat. This lovely is an evergreen tetraploid with good branching. It is pod fertile. The plant is sturdy and holds up it’s heavy bud load well.
Parentage: (Korth 14-7 X Calling All Angels). Korth 14-7 parents are (Cherry Valentine X Gertrude’s Melody)
Help your plants do well by reading “Getting them in the Garden”
Now you are ready. The fruits of your labor are hanging on the vine.
Wouldn’t it be nice if all of the vegetables and herbs were ready at the same time?
Unfortunately it doesn’t usually work that way. Some herbs are ready early and the peppers don’t usually show up in Wisconsin until quite late, while the tomatoes usually trickle in over a 2 month period.
Tomatoes should be picked when they gain full or nearly full color and begin to soften. Pick them with the “cap” on (a small part of the vine), they keep longer that way. In hot weather fully ripe tomatoes don’t last long on the vine. They will ripen nicely on your kitchen counter. Don’t put tomatoes in the refrigerator.
Peppers can be picked when they reach a nice size, but leave them on the vine longer so that they change to their fully ripe color to add extra color to your salsa. Peppers do not continue to ripen once you pick them.
Be sure to thin your onions (you can eat the small green ones too) so that they have plenty of room to reach full size. Make sure to water them or they will never really fill out.
Harvest your herbs when they are on the young side and preserve them by drying or freezing until it it’s time to make your salsa. Really, herbs can be snipped any time you need them, but ideally you would pick them in the morning after they were watered the night before. You can store your herbs for up to a week with the stems in cups of water on the counter or in the refrigerator. Don’t put basil in the refrigerator. It will turn brown.
Tomatoes can be blended or chopped and frozen until you get enough to make a batch. Go ahead and add some of the herbs now, it’s easier than freezing them separately. Dice up some of the peppers too and freeze them if you get too many of them before it is time to make your salsa.
Hurray, we’re full into spring and it’s time to plant your salsa garden outside! If you followed this series and started with seedlings indoors…I hope you’ve got a great crop started! If your first attempt at starting indoors was less than successful, that’s okay, stop by your local garden center and embellish your seedlings with purchased starter plants!
Then you may have read about “growing your own fresh ingredients” so you can pick up seeds and herbs while you are at the garden center if you have not already grown them.
Getting your Salsa plants planted:
Choose an area with at least 6 hours of full sun and a nearby water source.
Loosen your soil and add compost in early spring, working it in, and top dress with compost again after planting. If you want to use fertilizers, it’s best to have your soil tested first to see what it needs. Testing your soil is never a bad idea but you can’t go wrong by adding compost.
When planting your tomatoes, plant them deep again like you did when you moved them to the bigger pots, or lay them down in a trench to plant so that only the top sticks up (this illustration is from the University of Arizona Cooperative Extension). Also, tomatoes are subject to disease. To prevent this, choose a different place from where you had them last year.
Wait to plant tomatoes out until danger of frost has passed in your area. (This map is from the Wisconsin State Climatology Office) There is lots of advice out there on how to get your plants out sooner and protect them, but really if you just wait a bit, the ones that you planted later will easily catch up to the ones planted earlier. Especially for the peppers and basil; just wait until it is good and warm out.
Give your plants space: 3-5 feet between tomatoes and 2 feet between peppers.
Use mulch around your plants to ward off weeds and disease by preventing soil from splashing up on the plants. Black plastic will warm the soil, but straw or other organic mulches work well, too and eventually add more organic matter and nutrients to your soil.
Provide support. Keeping the plants off the ground also prevents disease and makes them easier to work with while preventing the fruits from laying on the ground and getting bad spots.
As they grow pinch off suckers (new branches that grow in between the main stem and the leaves). This illustration is from dummies.com How to Grow Tomatoes. Be ruthless!! Some of the suckers will be small as shown in the first picture and some (especially those growing near the bottom of the plant) will be quite large as shown in the second picture. Preventing all of that green growth will force your plants to produce more fruit.
Weed, water and harvest weekly. This task will remind you why you were supposed to start small! Consider using a soaker hose as it conserves water and prevents disease by decreasing the amount of soil that splashes up on the plants. If you use a sprinkler, do it in the morning so plants have a chance to dry before the cool evenings. Consider using a raised bed. This will help the soil warm up faster in spring, prevent the soil from becoming compacted and can be easier to keep weeded.
So what other plant “ingredients” can you add to your salsa garden? I should also mention that all of the “salsa plants” need sun so be sure to choose an open area.
Onions – You can start seed along with your tomatoes but I recommend starting with sets. Plant them in early spring as soon as the soil can be worked. Kids love planting these “big seeds”. Or you can use “Winter Onions”. Here is some more information on winter or “walking” onions. My very favorite onions are Cipollini onions. These flat heirloom onions are so sweet and delicious when caramelized. Here are a few more onion growing tips:
You can plant them kind of close but only if you intend to thin them to use for green onions. They need room once the bulb starts to swell.
Onions are heavy feeders so add plenty of compost.
Make sure the soil is loose. The bulbs can’t fill out in a heavy or compacted soil.
Keep the area weeded. This is even more important than the rest of your garden. The onions won’t fill out with competition from weeds.
Garlic – you may have to add this one next year because its best if planted in the fall. You can plant it in spring in areas with a longer growing season. Order some or get them from the garden center. Avoid grocery store garlic as it’s been treated so it won’t sprout. There are lots of varieties of heirloom garlic for you to try. Here are three of my favorites; Music, Shatili and Bogatyr. Try some white German porcelain (hard neck) varieties which store really well and some red Rocambole types which are great for roasting and are easy to peel. My favorite is Spanish Roja. Garlic is in the allium family so all of the tips for onions apply for garlic too. Here are a few more growing tips.
Separate the bulbs and plant the cloves individually. Keep the husks on. You will get the larger bulbs from the bigger cloves.
I have seen different recommendations for how deep and how far apart. I like to do them about 4 inches apart and 6 inches deep. Some recommendations are as little as 2 inches deep. I think deeper is better in the north.
Keep them watered during development but not overly wet. Let them dry out before harvest.
Garlic scapes, flowers and bulbils are all edible (more on that later) but remove them so the energy goes into producing larger bulbs.
Harvest when about half of the leaves have dried out.
Hang your garlic and let it dry and cure in a warm area and then store it in a cool, dry place but not in a sealed container.
Tomatillos – these are optional, for Salsa Verde. They are grown just like tomatoes except for a few major differences.
You will need at least two plants. One plant will not pollinate itself and you will not get much fruit.
The plants will get large and sprawl just like tomatoes, but I don’t usually prune them like tomatoes. Just cage them up.
The fruits have a papery outer cover that will need to be removed before using. They are ready when they fill out the shell. Leave this on for storage.
Herbs – Many people have a separate herb garden. You can still have that too, but put some herbs with your vegetables too. They attract pollinators and can help repel insect pests. They are also pretty and having them together makes harvest easier.
Oregano – make sure you get the Greek oregano which has white flowers. It tastes much better than Oregano Vulgare which has pink flowers and can be invasive. Having your herbs near the peppers and tomatoes will help with pollination because they draw bees.
Marjoram is similar to oregano but it is an annual. Pinch back often. You can read “Oregano can be confusing” for more on Oregano and Marjoram.
Cilantro and Coriander are the leaves and the seeds of the same plant It will have to be planted more than once as it is a “quick plant”. I keep cilantro seeds in a waterproof container in the garden so I can replant whenever I harvest. Or, let the plant go to seed; it will self sow. The leaves can be used in fresh salsa, but they lose their flavor when used in salsa that is cooked down for a long time. For this type of salsa use ground coriander instead.
Cumin – This herb is grown for the seed which is ground to make the spice. You can grow it if you like but if you do start seeds indoors along with the basil because it takes a very long season to mature. It is difficult in northern areas so it is okay to buy this one. It does make a great addition for the way it attracts beneficial insects, even if it never ripens.
Basil is not usually used in salsa, but you can make some Bruschetta, too! Basil is an excellent companion plant for tomatoes. I think it actually helps them taste better…and it repels bad bugs like white flies and aphids. Plus, it draws bees to help with pollination.
Borage; although I have not used it in my salsa, it will help repel the tomato horn worm.
Thyme, Parsley, Dill, Garlic Chives and Chives could also be added to your salsa garden.
Some other fruits and vegetables that will add a delicious twist to your fresh salsas include: watermelon, pineapple, strawberries, blueberries, cherries, pomegranate, mango, peach, apples, cranberries, black beans, corn, jicama, cucumber, pumpkin and avocado.
There are also some common salsa ingredients that will probably not be grown in your garden. Of course no two salsas are alike so these are just suggested additives…You don’t have to use them all.
Salt and Pepper
Chili Powder – You could make your own if you want. There are many types to experiment with including cayenne, chipotle and paprika.
Hot Sauce – Here’s another project you could try.
Cinnamon – Just a little
Sugar – just a little; or consider trying a “better” sweetener like honey, maple syrup, agave or stevia.
Lime or Lemon Juice
Citric acid powder
Vinegars like apple cider, red or white wine or balsamic
Oil of various types
Various nuts or pepitas
Big Zac
The miracle of planting a seed and watching it sprout is sure to give a kid “ownership” of his or her Salsa garden.
“Getting it in the Garden” will be featured in next blog. Happy growing!
If you are purchasing your plants as a gift we can send out a gift card since the plants won’t arrive until spring. This is a photo insert card and we include quality photos and descriptions of the plants that you purchased. The card could also be used as a mat to insert in a small frame if you wish. The card includes space for a special message from you. We can print the message in the card for you or leave the card blank for a hand written message. You can use one card for multiple plants. If you do this one photo will be on the cover and the rest will be inside. If by chance you are getting gifts for more than one person just specify which plants go with which card and purchase multiple cards. If you would like to include a message just email us what you would like to say. The card (as well as the plants in spring) can be mailed to you, or directly to the person that will receive the gift. There will be a place for special instructions to us when you place your order or drop us an email at: