A place for gardeners, foodies and garden inspired artists.

Tag: Gardening

Pasque Flower for Easter

Easter is tomorrow. Let’s remember that the resurrection is for the garden too. Spring brings the waking of the natural world after the dead of winter. The tradition and symbolism associated with Easter in the Northern hemisphere is very much a spring festival, and we think of the Christian resurrection, but also of life and rebirth in general.
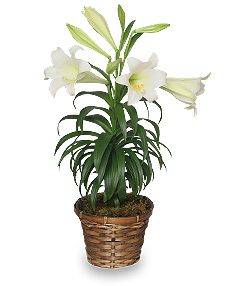
Easter LilyThe Easter Lily

The Easter lily is the most popular Easter flower in America. Millions are grown each year. They are usually forced in greenhouses to assure that they bloom at the right time. Long before the advent of Christianity, the Lily was considered a symbol of life and was associated with various goddesses of fertility. For Christians, the white lily stands for purity, and the Easter lily has become a symbol for us of the resurrection of Christ. The most commonly grown lily, that is called “Easter Lily” is the Bermuda lily (Lilium longiflorum). However, other white cultivars are also grown as Easter lily. In many areas you can plant your lily outside Lily regale (tetraploid)1after it has served as an “Easter Lily”. In future years it will not flower at Easter time. I guess I don’t personally care for Easter Lilies, and they are not hardy here in far northern Wisconsin. We did, however, have them growing in our garden when we lived in southern Wisconsin. Here is my “Easter Lily”; it is the “Regal Lily” (Lillium Regale). It is much taller than everyone else’s “Easter Lilies” at about 4 feet and has a pink cast. It blooms in late July, not at Easter time. The original “Easter Lily” was probably the exquisite Madonna lily (Lilium candidum), which grows wild in the Mediterranean, but not in Wisconsin. Madonna lily looks a lot like our modern Easter lily but it also is a lot taller.

Pasque flower white (2)1The Pasque Flower

The pasque flower is another plant closely associated with Easter. It is from the genus Pulatilla, which is sometimes considered a subgenus of the Anemone. The pasque flower blooms in the spring and its name comes from the French word “Pasque” which means Easter. It has also been known as the “pash flower” or “passion flower”. Although it is more obscure; for me, this is the best flower for Easter.  It blooms naturally at this time and is fully hardy. There are native and hybrid varieties from Europe but there are also closely related North American natives. The botanical name also has references to Easter, the genus, Pulsatilla, means “beaten” (as in Pasque Flower1beaten by the wind, or “wind-blown”). This may refer to the way that the wind treats these early flowers, but it also reminds us how Jesus was treated. Meanwhile, vulgaris means “common.” European and hybrid varieties can be lavender, dark purple, reddish-purple, cream or white.

Pasque flower or Pulsatilla vulgaris is a member of the buttercup family (Ranunulaceae). Closely related is Pulsatilla Patens (sometimes classified as Pasque flower - Pulsatilla1Anemone Patens) this is the one that is native here in North America. Patens means “spreading”.

It is perennial and grows to only about 8 inches high. Pasque Flower forms a clump that spreads over time, but not quickly. This little beauty is found across the Great Plains and into Alaska and Siberia. The solitary flowers come up first from each basil cluster. There are 5 to 8 petals which are not actually petals but “sepals”. They are fuzzy on the outside but not on the inside. They can be lavender, blue or white. The Pasque Flower 21pistil terminates in what looks like a purple fuzzy button. The color may vary according to the flower color.

This is surrounded by 150 to 200 stamens with yellow anthers. My favorite thing about them is that the leaves, stems and undersides of the flowers are covered with silky hair. These “fuzzy” plants then develop beautiful wispy seed heads that are as nice if not nicer than the flowers.

Another bonus with pasque flowers is that animals like Easter bunnies and deer Pasque Flower 41don’t eat them. There are not very many flowers that bloom this early. Snowdrops, crocus and other spring bulbs compliment the pasque flower and the Lenten rose or hellebore actually precedes it, blooming even earlier than Easter. There is something special about those first flowers to greet you in spring after a long hard winter.  Sometimes they even bloom through the snow here in Wisconsin.

Plant Pasque flower in full sun to part shade. It likes well drained sandy or loamy soil.

Pasque Flower - Pulsatilla patens (2)1The plant is now generally considered to be poisonous and is not recommended to be used externally either as it will raise blisters on the skin. It was, however, used in the past by Native Americans to induce labor and for skin lesions and arthritis. Other medicinal uses are also mentioned by various sources.

Pasque flower is sometimes confused with Prairie Smoke (Geum Triflorum). The seed heads look similar but are more reddish than Pasque flower and the flowers are also reddish.


Easter’s coming makes me think of all these flowers popping out. As Christians

Prairie Smoke

Prairie Smoke

celebrate the resurrection of Christ we also mark the return of spring. With more than a foot of snow falling on Holy Wednesday this year it will seem more miraculous and more to be celebrated this year than ever. The flowers were peaking up before the blizzard so when spring finally comes – as soon it will – it will truly seem like a rebirth.

Click here for Early Spring Flowers

For Early Spring Bulbs Click here

Heartsease a favorite spring flower.

The History of Basil

basil used for embalmingSome ancient cultures considered basil a magnificent, royal or kingly herb.

Some say “Basil” is derived from the Greek word basilikon for “royal.”

As a passport to help the deceased to enter Paradise, basil was used as a botanical in embalming bodies. It was found with the mummies of ancient Egypt. Perhaps because of its embalming usage, basil was also a symbol of mourning.

Basil in Ancient Chinese MedicineMost likely basil is native to India, but there are some indications it may have originated even farther east. Ancient records from 907 A.D. indicate sweet basil in the Hunan region of China where it was used medicinally.

It migrated westward as whole plants, since it could be grown easily indoors away from frost exposure. Basil is also known as St. Joseph’s wort.

Basil is a member of the large mint family. It is known botanically as Ocimum basilicum.


Basil lore and legend

BasiliskOthers say the name Basil was derived from Greek mythology.  It’s named after the terrifying basilisk, a half-lizard, half-dragon creature with a fatal piercing stare. The basil plant was considered to be a magical cure against the look, breath or even the bite of the basilisk.

Possibly because of this association with a mythical “lizard”, basil is considered a medicinal cure for venomous bites. It is not however documented as an actual cure for snake bite.

roman sowing basilIn keeping with its hostile status, later Greeks and Romans believed the most potent basil could only be grown if one sowed the seed while ranting and swearing. This will give you an excuse if you misbehave while planting your herb garden. In French; semer le baslic (sowing basil) means to rant.

In Greece today, basil is used in certain religious rituals as a symbol of fertility.

Basil used to make a scorpionIn medieval times, it was thought that scorpions came from basil. Legend says to acquire a scorpion, one should place a few basil leaves under a flowerpot and after a while, the pot would be lifted to expose a scorpion.

Goddess-TulasiIn India, basil was consecrated to the Hindu god, Vishnu, whose wife Tulasi (also known as Tulsi) was said to have taken the form of basil when she came to earth. Hindus avoid harming basil plants, unless there is a good reason, and even then offer up prayers of forgiveness for touching a part of Tulasi. Interestingly enough, tradition requires the head of a Hindu be bathed in Tulasi water before being buried and a Tulasi leaf is placed on the chest over the heart.

Dragobete-RomaniaTo the ancient Romans, it was a symbol of hatred, yet basil eventually became a token of love in Italy. Young maidens would wear a sprig of basil in their hair to profess their availability. In some regions of Italy, basil is known as “kiss-me-Nicholas.” One can only wonder if the conflicting symbolism of basil in Rome Is the origin of a love-hate relationship.

The royal herb is regarded in a similar manner in Romania, where it is associated with the Dragobete celebration of love and happiness. If a boy accepts a sprig of basil from a girl, it means they are engaged to be married and if a girl places a sprig under her pillow she will dream of her future lover.

Click here to learn more about Basil.

To Grow Great Basil read this.

Care and Culture of Hosta

Coleus, Impatients, hosta bressingham blue and Pineapple mint1Hostas are one of the most popular perennial plants grown in our shade gardens. They are tough and reliable in both shade and partial sun. Many people think of them as simply the common plantain lily that we see so often which is green or the standard green and white that is sometimes called “Silver Crown”. But the hostas of today are so much more. The variety of foliage is enough to make your head spin. In the old days we used to cut off the little ragged purple flower scapes or racemes, but many hostas today display fragrant blooms from early summer to fall depending on the cultivar. The trumpet shaped flowers could be lavender, white, bicolor or sometimes a little bluish.

Hosta Elvis Lives, little Aurora, Fire Island and Island Charm1People sometimes ask me to give them a name for their unidentified hosta and some varieties are distinctive enough that I can, but with over 3000 named varieties available, and more being introduced each year, knowing them all would be a real trick. The foliage may be all shades of green, yellow, gold, chartreuse, white, cream or bluish. Many are variegated forms with more than one color. The plants may be huge or tiny and the form may also differ from mounding to creeping to vase shaped. Some even tolerate some sun. So there is likely a hosta available for nearly any landscape situation.

Hosta Marilyn, Great Expectationsm Twist of Lime and Striptease with PrimroseCultural Requirements

Hostas are generally hardy in zones 3 – 9. In zones 8 and 9 it is best to give them a little more shade. It is possible to have them in shade that is too deep. They do need some light to do well.

Planting

Hostas grow by underground stems called rhizomes and then they produce their beautiful foliage unfurling the leaves from points called “eyes”. In order to grow a hosta you will need some of the crown tissue and at least one eye, preferably with a nice tangle of roots attached. In spring when your hostas are coming up, be careful not to step on the emerging eyes. Remember, all of the leaves for the whole year are contained within them and if you damage them at least the early season leaves can be deformed.

Hosta Fire Island, Island Charm & June1Hostas that you order from Catrina’s Garden will have at least 2 nice eyes for the really large ones and at least 3 eyes for medium, small and miniature hostas. It is a matter of what we can fit in the box.

Space your hostas according to their spread at maturity. I have to admit to putting them too close. This is easy to do when they are small. I never seem to have enough garden space. You could move them when they get too close, which is what I do, but they really don’t love to be moved too often, and if you don’t get to them when you planned to, the big ones can shade out the others.

Hosta Elvis Lives, Paul's Glory, KarinThey ideally prefer rich, well-drained soils amended with organic matter, such as compost or rotted animal manure. Hostas do best on raised beds. They will not tolerate soggy conditions, especially during the winter months. This will cause them to rot. This is the ideal situation; however, these are tough plants. They will live in poor or dry soil but they will not grow as fast. They tolerate clay, sand and even a few rocks but will reward you if you amend the soil as mentioned above.

Hosta Platinum Tiara1Plant your hostas by digging a hole as deep as the root ball and at least twice as wide, work up the soil well so that they have nice loose soil to spread out in. Backfill and tamp it down enough to remove air spaces. The eyes should be just peeking above the ground but the crown and roots should not be exposed. The ground should be level with the surrounding soil not sunken or mounded. It is okay to place a ring of soil to keep the water from running off when you first plant.

Hosta Twist of Lime and minis Iris Cristata with gnomes1Water well…especially when they are newly planted. They are pretty resilient once they are established, but may need some supplemental water in drought conditions. They grow the fastest when they are evenly moist but not soggy.

Dividing

Dividing is not necessary for the health or vigor of the plant. It is only necessary if you want more hostas. Planting, transplanting and dividing should be done in early spring when the leaves begin to emerge. Dividing can be done either by cutting away a section of a clump with a sharp shovel or by lifting the root mass and separating it by hand. It is probably better to opt for the second method so that you don’t accidentally chop off some of the eyes. Separate the plant so that an “eye” is Hosta Paridigm and Astilbe Amethist Mistpresent in each division. You may need to use a sharp knife or large forks to pry the divisions apart. Clean your tools between plants please. Very small divisions tend to establish slowly so that is why it is better to keep more than one eye together. Most hostas can be divided in four to five years, or sooner depending on the vigor of the clumps. We don’t recommend dividing the large hostas after they have leafed out completely. You will end up breaking them up. Hostas do grow a few more leaves throughout the season but not a lot like some other plants and they need their leaves to store energy for next year. Small and miniature hostas can be divided until about mid-season, but even these we do not recommend transplanting in fall. Hostas really need to be established to survive the winter in the north. For this reason we only sell large hostas in spring and other hostas not after August.

Hosta Venusta with Touch of Class, Drumstick Primrose and Brunaria

Hosta Venusta with Touch of Class, Drumstick Primrose and Brunaria

Light

Light requirements can vary with each cultivar. Some require full shade so that leaf scorching does not occur while others (usually the yellow ones) can tolerate more sun. Hostas will actually grow faster with more sun. I usually tell people that if it doesn’t look good where you have it, then move it to a shadier spot. Getting too much sun won’t kill the plant it just won’t look as nice. You may also notice that your hostas may vary in color (the same cultivar) depending on how much sun they get. You may notice that some hostas, especially the dark blue ones have a waxy or powdery coating. This helps protect the leaves from sun scald. You can’t help the rain, but you can avoid getting water on the leaves when watering.

Hosta Radiant Edger and Little Wonder

Hosta Radiant Edger and Little Wonder

Fertilization and Watering

Hostas grow best in fertile soil. As always, it is best to test the soil with a soil test, but if you wish to use fertilizer a general rule is 1/2 pound of 10-10-10 per 100 sq. ft. at planting or when growth emerges in the spring. If you must use this avoid letting the granules set on the leaves or on the base of the crown. This will burn them. Here at Catrina’s garden we prefer to use compost. Add some to the planting hole along with the soil that you removed and you can also top-dress throughout the season. It is best to put the compost around the plant so that it can leach down to the roots and not directly on the crown in order to avoid rot. You could also consider using organic fertilizers such as blood meal, bone meal, composted manure, and fish emulsion. Nutrients are released more slowly. Stop fertilizing in August. The plants should be hardening off at this point and getting ready for winter, not putting on new growth.

Hosta Fire Island, Little Aurora, Island Charm

Hosta Fire Island, Little Aurora, Island Charm

Mulch

Organic mulches, such as shredded bark, shredded leaves, or pine needles, will help to conserve and retain the moisture needed for hostas to succeed. Apply mulch after the soil warms in late spring to early summer to maintain a 2-4 inch layer, taking care to keep it away from the plant’s central crown. In addition the mulch will help to suppress weed growth, keep soil temperature even, and eventually decompose releasing nutrients into the soil.

Hosta Bressingham Blue

Hosta Bressingham Blue

Watering

Keep them moist but not wet by applying supplemental irrigation only when necessary. Hot summer days may require additional irrigation. Avoid planting hostas in areas that receive direct afternoon sun. Watering deeply less often is better than shallow frequent watering.

Cutting Back

As mentioned earlier some people like to cut off the flower racemes. Why not try leaving them to see what the flowers look like. Some are actually quite nice. Others are also quite fragrant. Please be careful if you get your hostas from multiple sources and big box stores. There is a virus out there called “Hosta Virus X”. You cannot always tell right away if your plant has this but you can spread it with your

Hosta Guacamole

Hosta Guacamole

pruning shears. If you must trim, please wipe your blade with bleach between each plant. For this reason I also recommend not routinely cutting off the foliage at the end of the season. If you wait until after a good hard frost the foliage will die down completely and then you can just lift it off. If you get snow early this can also be done in spring. This method is actually much easier too. The only sure way to tell if your hosta has this virus is with an expensive test; however, some symptoms of virus include yellow or spotted foliage and dwarf, irregular or disfigured leaves. It’s really hard to tell though, and sometimes these same symptoms can be due to physical injury, drought or nutrient problems. Just play it safe and don’t go from plant to plant with your pruner.

To view all of the hosta offered by Catrina’s Garden click here.

Maple Sugarin’

Early spring in Catrina’s Garden means maple sugarin’ time. We’ve been sugarin’ for 20 years since moving “up north”, beginners by the standards of our neighbors. We are not a large commercial operation. We do it for fun and currently tap around 30 trees each year. We do it the old fashioned way, making actual maple syrup “liquid gold” to feast on.

We look at maple sugarin’ as a time to celebrate the changing of the seasons, spend some time in the woods and use the sweet gifts that the trees around us provide. After the first year; experiencing the magic of turning a byproduct of nature into a delicious treat, we have done it year after year. We consume it ourselves and give it as gifts. We also use it to “barter” for other products from nature that we love….like morel mushrooms. It’s a great activity for kids, or a chance to invite the neighbors over.

sugar Maple Acer saccharum in fall

sugar Maple Acer saccharum in fall

The trees most commonly used to make syrup are Sugar maple (Acer saccharum), but other maple species and even walnuts or birch can also produce syrup, though it is not commonly thought to be as good. I am often asked how to tell them apart from the red maple which also grows in abundance here. Look at the leaf margins; the area between the lobes of the maple leaf. A sugar maple will have a smooth U shaped leaf margin Maple Syrup Sap sign in the snow1and a red maple will have a slightly serrated V shaped leaf margin.

Maple Syrup drilling holes1Maple Syrup Pounding in taps1Maple Syrup Sap Dripping 21The ritual starts in March when those first lovely warm days roll around. Usually our modern weather people can predict these days. That way we can start getting ready ahead of time, but when we start seeing signs in the snow like this, we know it’s time to start tappin’. Simply drill a hole, stick in the tap and hang the bucket. You drill in at a slight upward angel, about an inch and a half to 2 inches. Be careful not to pound too hard when inserting the tap or you could split the tree. Use trees that are at least a foot around and if you have a really big tree you can place more than one tap.

1Maple Syrup Sap Dripping 5When the days are warm and the nights are cold this is when the clear sap begins dripping….or pouring from the trees. It’s a lot of work. Sap is collected daily or sometimes more often. We have no “lines” like the big guys and since we don’t tap too many trees we store the sap until we have enough to “cook”. It’s a lot of work. You can burn of that winter fat. The sap must be kept cold. We keep 40 or 60 gallon cans packed in snow on the north side of the shed where it slides off the roof.

So what makes a “good tree”? I think more than anything it is placement.  If the sun shines on the trunk it runs well. Some years when we are lazy and the snow is really deep we just tap the trees that are near the driveway and we do fine.

Filter the sap when you put it in the pan and again when you take it off to remove impurities and debris. Rain is your enemy. If you use open buckets you may have to dump some sap if you have a lot of rain. A sugar shack is nice for cookin’ but if you don’t have one cover the pan and wait till it stops if you have a hard rain.

It’s time to cook when we have about 150 gallons.  It roughly takes 40 gallons of sap to make 1 gallon of syrup. Sap is usually around 2-3% sugar and syrup is 62% sugar.

ACD Systems Digital Imaging

We add nothing to the sap but heat; lots of heat. We cook in a shallow pan over a wood fire. We cook….and cook….and cook….for days. Sometimes foam will develop. Skim that off. This is a good chance to “make wood” too! What else are you going to do while you are standing around waiting for the sap to cook? If it was a hard winter you may need some more wood to cook the sap, because you are out, and you may as well put some up for next year so that it can age.

1Maple syrup in jarMaple Syrup on spoonWhen it starts to get thick you better watch it closely. We used to “finish it” in the pan but we lost a few batches by burning it, having it turn to rock candy or spilling it on the ground when “taking it off” in the middle of the night. Now we cover it when it is getting close and let the fire go out; getting to bed at a reasonable hour, and finish it the next day in a turkey roaster. I wouldn’t recommend finishing it in your kitchen though some people do it. The cupboards and floor stay sticky for a very long time. Keep a 5 gallon bucket of sap on the side that you can add at the end if necessary. Sometimes it can “turn the corner” quickly.

The old timers can just tell when it is done. We use a hydrometer to measure the viscosity of the syrup; to make sure that it is perfect every time. Bottle and enjoy!

Salsa Gardening – Before the Thaw

Child with tomatoGetting the family involved in gardening is a popular quest. The challenge is how to get the kids interested. Have you ever thought about planting a SALSA GARDEN?! Although your children may not love tomatoes and peppers (and onions, garlic and herbs) individually – once they realize when you put them all together it makes salsa – their interest will peak! Growing the ingredients to make this delicious dip will be rewarding whether you have little hands helping or not. Imagine the delight of your friends at a picnic gathering when you tell them your salsa was not only made from scratch, but you even grew the vegetables! How “green” of you!

Seed packets 2This fun project lasts all year, from planting to eating! So let’s get started–in our northern Wisconsin climate, your tomato and pepper seedlings should be planted now, indoors! You could have actually started the peppers a while back because they don’t outgrow their pots as fast as tomatoes.

Let’s talk tomatoes today. The best tomatoes for Salsa are paste types. Everyone is familiar with the old standard–the Roma–but there are dozens of heirloom paste tomatoes available. Great varieties to Tomato (10)1Corno-De-Toro-Pepper-225x300look for are: Amish paste, Opalka, Long Tom, Principal Borghese, San Marzano, Oxheart or Bull’s Heart (a really large paste tomato). Gildo Pietroboni is a little hard to find but this Italian paste is twice as big as a Roma and well worth the search when it comes to flavor. Add some fun to your tomato quest by making your salsa different colors with: orange, yellow or black Oxheart; Black Prince; Yellow, Green or Cream Sausage; Speckled Roman; Orange Banana or White Wonder tomatoes.

Next, the peppers; some great pepper varieties for a milder salsa are any of the Marconi’s, Hungarian Wax peppers, Poblano’s, Bermuda’s, or Ortega’s. You can get the crunch and look of a Jalapeño without the heat if you use Fooled You Jalapeño’s.  If you like it hot(!), consider using Cayenne’s, Tabasco’s, Serrano’s or the hottest…Habanera’s. Many of the ornamental pepper varieties that have variegated leaves like Fish, Trifetti, Masquerade and Black Pearl are also quite hot.

Now, the growing! Growing your seedlings is easy, really! The key is to start with the right ingredients.

  • Clean your potsUse jiffy mix or another super lightweight soil especially designed for seed starting. This will help prevent your seedlings from rotting; otherwise known as “damping off”. You can also use one of the prepackaged seed starting kits.
  • Start small. It’s easy to end up with way too many plants. But if you do, just share the extras with your family, friends or neighbors!
  • Very important. Clean your pots if you are reusing them. Seedlings are very susceptible to damping off, which is a fungal disease that causes them to simply rot and fall over. This is how I do mine, but you can wash them by hand if you wish.
  • Sprout seeds with bottom heatMost important, the seeds; needless to say, I LOVE SEEDS, they have such potential. Don’t you just marvel in how a huge plant can spring from this small piece of life?
  • Use bottom heat to get the seeds to sprout. Any warm place like the top of the refrigerator or an old-fashioned radiator will do. I use the bathroom floor as I have heated tile. My hubby wanted to know why I need the heating cables under the sink.
  • Water from the bottom too. Place water in the bottom tray, not on top of the soil.
  • Spring Seedlings1Move the seedlings to a bright window or under artificial lights as soon as they sprout (shop lights work well but lower the lights so they are just a few inches from the plants).
  • Thin the seedlings so they’re not crowded as they grow and move them to a bigger pot when they start to get big. Be ruthless; I know it’s hard. No one wants to kill their babies. Give some to your friends if you can’t do it.
  • Every time you transplant tomatoes plant them deep so only the top of the plant is sticking out of the soil. They’ll develop roots all along the stem and become strong. 7. Don’t plant your plants outside until it’s good and warm–but gradually set them outside to get them used to the outdoor weather. Bring them in on cold nights. Pepper plants are more susceptible to cold weather.

If you don’t want to take care of seedlings all winter never fear! It’s okay to purchase your seedlings. Be sure to check back and see what other ingredients you will need for your salsa garden!

Planting Your New Daylilies

Daylily Bama Bound1Daylilies are the ideal plant to purchase bare root. They are tough, and the way the root system develops will help them travel well. The thick swellings are actually tuberous roots. They store energy for the plant and help them if they are out of the ground or living in a pot for a while.

Here at Catrina’s garden we do not store your daylilies over the winter.  They are kept in the ground until spring when we dig them the day before we ship them. After digging them we clean, trim and label them, then we let them dry for a few hours before they are packed. All of these steps are important.

Daylily Bright Sunset (5)1All soil is cleaned from your daylilies. Although daylilies (especially those grown in the north) don’t have many disease or insect problems; removing the soil prevents nearly any chance of moving soil insects and weeds from one area of the country to another.

So why do we cut them back? Even though daylilies are really tough, all plants are shocked when transplanted and will need to go through a recovery period. Cutting them back has 4 purposes. It allows us to fit more plants in the box. It makes it easier for us to see the crowns when dividing. Most important is that it is better for the plant. There will be less foliage that the plant needs to support while recovering, and lastly there is less water lost from the plant when there is less foliage. When you plant your new plant it is normal for the outer leaves to dry up and turn brown and you will notice new green foliage coming from the center of the crown.

Daylily Indian Giver1Your plants are dried before they are packaged so that they will not rot or grow any mold while they are in the box. They are labeled for obvious reasons…so that you know which is which, since you can’t tell them apart otherwise…until they bloom.

The most important thing when receiving your plants is to plant them as soon as possible. You may want to start finding a spot for them and getting the soil prepared when you hear from us that they are being shipped.

Daylily Jo Barbre (2)1In choosing their new home there are four things to be considered

  • Daylilies do best in full sun. They will not likely die if you plant them in the shade, but they will not bloom well. Please plant them where they get at least 6 hours of sun for best blooming. You could consider planting your dark purple or red varieties in partial shade. They can get spots from too much sun especially if they are wet. Some think a little morning shade allows them to dry off the dew before the sun hits them and some think afternoon shade keeps them out at the hottest part of the day.
  • Soil Type – Daylilies will truly grow in almost any type of soil. They will flower better in a rich fertile soil. Adding some compost will help a clay soil more become more friable and will help sandy soil increase water retention.
  • Poor drainage will only be a problem if it is severe. You don’t want your daylilies standing in water, they could rot. If you have really heavy clay or are in a low area consider a raised bed.
  • Space – Give them a little space. If they are too close to trees, shrubs, weeds or other daylilies they could be robbed of water and nutrients. You don’t want to plant different varieties too close together as they will get big and grow together and you could lose track of which variety is which or a more vigorous variety could “take over” a weaker one. Do feel free to interplant with other perennials. I recommend planting them at least 18 inches apart, or a little wider.

Daylily Little Missy (4)1When preparing the spots for your daylilies work the soil down at least a foot to loosen it up. Your hole should be bigger than the root mass if possible.

Because your plants have been dried and have spent some time in a dark box you may want to put them in a bucket of water for a few hours before planting them. Some people don’t agree with this. If your plants don’t look dry at all this may not be necessary. The big thing here is not to leave them in the water too long…over night at the longest. Leaving them in water longer than this could lead to rot. If you can’t get them planted right away bury the roots in a bucket of damp sand or plant them temporarily in a pot or close together in the ground. Please keep them watered.

Daylily Little Rusty and Ice carnival1Some people like to add a weak solution of fertilizer to the water. This could help but be sure that it is not too strong or it could burn them. We don’t use fertilizer because we garden organically. When I purchase my own daylilies I put a small shovel full of compost in the water to make a compost tea. If they don’t look dry it is perfectly fine to plant immediately and water well.

Water them well…ah yes; that is the key. Daylilies being the strong carefree plants that they are need little supplemental water in most areas, once established. They do however need frequent watering when they are first planted; especially if planted in the summer, or in hot, dry climates.

Daylily Siloam Doodlebug1So how exactly do you plant them?

  • Make a little mound in the center of your hole. This is because the daylily has a crown and roots that are fanned out around it. You want the roots to be draped down deeper than the crown and the crown should be sitting at the same height in the soil as it was previously.
  • You can see how deep to plant them because the part that was under the ground before will be white and the part that goes above the ground is green.
  • The crown should not be more than an inch below the surface.
  • Firm the soil around the roots to remove air pockets but you don’t have to pack it super tight.
  • The new plant should be the same height as the surrounding soil, but you can make a bit of a soil ring around it so that the water doesn’t run off.
  • Water well…oh yeah, we already said that.
  • Label your plant – Some people don’t care about the names of their plants, but even if you don’t, you may want to know what color it is. Just use the name. Even if you don’t care about it now you may find that you do in the future. Daylilies can lose much of their value if they are nameless. I have a few from when I first started gardening that are lovely but I can’t sell them because I don’t know their true identity.

Daylily wild ruffles (5)1Some things to remember:

  • Diploids including most spiders and miniature daylilies will have much smaller fans than tetraploids. This is normal. We always send at least 3 fans of daylilies that have small fans, many times more. For large tetraploid daylilies you will always get at least two large fans, many times three. Usually, the limiting factor will be the size of the box.
  • Daylilies that grow in the far north may be smaller in size than those grown in the south. Really; they will perform just as well if not better, especially for those of you that live in the north. They also have the benefit of not having troubles with rust. If you get a huge fan from Florida or Alabama you will notice that it will be smaller before too long when you plant them in the North.
  • Your new daylilies probably won’t bloom the first year. This is normal. Remember, they are recovering. Some people even cut the scapes off the first year to help the plant get a strong start. Scapes are the stalks that produce the flowers. I like to leave just one scape to make sure that I got the correct plant.
  • Please judge your new plants by the roots not the leaves.
    • Enjoy your new daylilies.

To see the daylilies offered by Catrina’s Garden click here.

Click here to see how to care for your established daylilies.

Grow Great Basil

Basil is easy to grow. If you are growing plants to put outside in the garden, here in Wisconsin you will want to start about now late February or early March). It is one of the first things I start along with parsley, peppers, eggplant and some early flowers like pansies and snaps. Wait a little while for the tomatoes or they will get too big too fast. (This is a gallery. Click one of the pictures to open it and click in the grey area to close)

Some of these pictures came from here.

Most places that sell garden seeds will have some kind of basil. Usually it is “sweet basil” which is just plain old regular green basil. It’s good and is a good fast, grower but there are so many other kinds. We will discuss the different varieties in detail in another blog, but do try lettuce leaf. Its leaves are twice the size of sweet basil. Try one of the many types of Thai basil. The flavor is a little more pronounced and the stems are purple. “Purple you say”; yes, if you like that try one of the varieties with purple leaves. They are very pretty and you won’t notice spotting as much. They make beautiful pink infused vinegar. Other varieties to try include lemon, lime, or one of the miniature types. I recommend a soil less seed starting mix as basil can be susceptible to fungal diseases.

Clean your potsYou have some choices; the little expandable pellets, small pots with the soil less mix or, you can use a larger pot with a nice rich soil on the bottom and then a layer of the soil less mi on top. If you use small pots you will have to transplant them into bigger pots as they grow. Use a clean pot. I wash mine in the dish washer. Fungal diseases can live from year to year on your pots.

Basil seeds1If the seed is fresh I usually put about 3 seeds in each pot. Space them out a little if you can. Put in a few more if they are older. If your soil is dry spray it with a mist bottle before you start. Bottom watering works best for seeds and really young seedlings and pre-misting the soil helps draw the water up better from the bottom. Bottom watering prevents the seed from being washed away and protects fragile young seedlings. Basil seeds do like to be covered a little bit. Either sprinkle them with a little more soil or poke them down with a tooth pick or something.

Be sure to label your seedlings. I like to use pencil. It doesn’t fade as much as markers.

Sprout seeds with bottom heatBasil loves warmth and they don’t need light until they sprout. They do best if you cover them to keep the moisture in and then put them somewhere that they will get bottom heat. The sell matts especially for this but I find that the heated tile floor in the bathroom works great. The top of the frig or the heating coils that are used to melt snow from the roof are some other things that I have heard of.

The next step is important. Check them every day. Water as necessary, by filling the bottom tray. You want them to stay moist but not overly soggy. When you see green it is time to move them into the light.

Spring Seedlings1Then you just let them grow. They need as much light as possible. If they don’t get enough light they will get tall and skinny and will have week stems. Either keep them in the brightest window with direct sunlight or use artificial light. Again, they sell set shelves that are set up especially for growing seedlings. You can however set up a growing station anywhere that you can hang lights. There are special bulbs for growing plants. They do help I think, but I have had good luck with standard shop lights. When using this method the lights should be lowered and raised as the plants grow so that the light is 2 to 6 inches above the plants. Don’t leave the lights on 24/7 though, plants have adapted to that period of darkness called “night” and some even bloom and or develop according to how many hours of light they get. I use a timer that turns the lights on and off at 12 hour intervals.

Some of my seedlings go out into the greenhouse early so that they can start to get used to the temperature fluctuations in preparation for moving outside but not the basil. Keep growing it in a nice warm spot. You will need to harden it off eventually to go outside but don’t even think of putting basil out until it is nice and warm. It’s the last thing we pant outside.

As the seedlings grow use a fan to circulate the air around your plants. This makes them stronger and helps ward of growth of fungus.

One more thing that makes basil different than how I grow most of the rest of my seedlings, don’t thin it. Tomatoes, peppers, Cole seedlings; all of these I would select as they grow, and keep the strongest seedling. Not basil, you can leave a little clump of them.  Not tons of seedlings, but up to 5 in a pot and then later planted into the garden together is fine.  This gives you more stems to harvest from and makes your plant(s) appear lusher. Basil doesn’t have a very dense root system so it doesn’t mind, but do give it some extra compost or other fertilizer when you plant it as it likes a nice rich soil.

Tomatoes and basil1Plant them out when there is absolutely no chance of frost. Water your plants regularly and harvest frequently.  This helps them become bushier. When you harvest take the top few stem segments just above where two leaves are attached. When you do this to new stems will grow out of the leaf junctions. Don’t just pick the leaves.

Now I have to wait until harvest time to write about making pesto.

For some more interesting talk on basil read “All About Basil”.

For the History of Basil click here.

All about Basil

Basil…either you love it or you hate it. Maybe if you hate it it’s because you haven’t really had “good” basil. Dried Herbs old1 Is this what the basil you are used to looks like? There is nothing wrong with dried basil, but if you use it this is what it should look like. Dried Herbs Fresh1Dried herbs don’t have a really long shelf life. Depending on where you store them the will only last about a year. When they have lost their bright green color and no longer have a nice aroma you may as well toss them. Old herbs won’t hurt you but as my dad says “they taste like grass”.


So where should they be stored? Well, dark and cool is best but you really don’t need to keep them in the refrigerator; just not right over the stove. Keep them in a container that is tightly sealed.

Freshly dried herbs are great but if you have never had fresh herbs you are really missing out. Here in Wisconsin, Basil is an annual herb. Basil and other annual herbs should be treated like fresh flowers. Many annual herbs can be stored for a short time in the frig.Fresh Basil1 If you put a piece of paper towel in the bag with them it will absorb moisture and keep them fresh longer. some people keep basil in the frig, but I wouldn’t recommend it. Basil will turn black if it gets too cold or will get dark spots. It’s still okay to eat if it’s not mushy; just not pretty.  Instead harvest it fresh (ideal) for each use or if you purchased it cut then put it in a cup or vase, just like it is a cut flower. It really can be quite beautiful. If you see it all the time, you will be more likely to use it too.

So, you could grow your own; we’ll talk about that next time.  However, you can buy it too. “It’s so expensive” you say. Well, yes, often times in the grocery store it is. Look for it at farmer’s markets and/or your local Asian market. If you find it for a good price get a lot and preserve it.

Thai basil flower1By the way, you can eat the flowers too. Try them, they are good; and also pretty on a salad.

Next click here to learn how to Grow Great Basil.

For the History of Basil click here.


Is it an Herb or a Spice?

My herbs are looking pretty good, even though it is very early in the season. Here on the border of zone 3 and 4, I moved some of them to the in-ground beds of my greenhouse so that I was able to use them all winter. After doing this for a few years, I learned that it is a good idea to dig them up earlier so that they can get a good root system developed before the cold weather sets in. This way they will live through the winter…even Rosemary.  Soon they will be moving back out to the herb garden.

Garlic Chives allium tuberosum

Garlic Chives allium tuberosum

We (meaning most cooks that I know) often use the words herb and spice as though they were the same animal. Herbs and spices both come from plants. Herbs and spices are both used to flavor food and add that all important aroma. Both are best when used fresh, but they can be saved by drying or in some cases freezing. However, don’t be fooled into thinking that this will keep them forever.

Powdered Spice (2)

Powdered Spice (2)

So, what’s the difference? Herbs usually, but not always, come from the leaves of herbaceous plants. What’s an herbaceous plant you say? Well, it is a plant that is non woody. This is why I say usually, but now always. I think rosemary and thyme among others can be a bit woody. Herbs usually are used in larger amounts than spices. There are some that say that an “herb” is any “useful” plant. The “use” doesn’t have to be for cooking. It can be used for medicinal purposes, for dying, or in any other useful way. In the middle ages they threw them on the floor to cover the stink in the house. The term “herb” is also used by botanists to mean simply that the plant dies down, and may not even be referring to its use. Most herbs originated from temperate climates like England, Italy, France, and yes; the “new world”. Some examples of herbs include: parsley, sage, rosemary and thyme (thanks S&G), but also basil (my favorite), oregano, marjoram, chives and mint, to name a few.

Thyme

Thyme

Spices on the other hand come from parts of the plant other than its leaves, like the bark, roots, seeds, fruits or flowers. To confuse you a bit, they can come from “herbaceous” or woody plants. The flavor of spices is, as a general rule, a lot stronger, so again, usually but not always, less is used. Most spices come from warm tropical places. Sorry dear, you can’t plant a Catrinas-Herb-Garden-159x300cinnamon tree in your yard here in Wisconsin. There are a few spices that actually help food keep longer as well as adding flavor. I suppose this could be helpful in a warm tropical climate. Examples of spices include: Cinnamon (this is the bark of the cinnamon or should I say Cassia tree-more on this in a future post), nutmeg, cumin, coriander and dill (all from seeds), Vanilla (from the underdeveloped fruit of an orchid), Ginger (a root), and Cloves (from a flower bud).


Some plants are both herbs and spices. The leaves of Coriandrum sativum are the source of cilantro (herb) while coriander (spice) is from the plant’s seeds. Dill is another example. The seeds are a spice while dill weed is an herb derived from the plant’s stems and leaves. In case you were wondering, salt is not an herb or a spice, it is a mineral.

Whole Spice (2)

Whole Spice (2)

Page 2 of 2

Powered by WordPress & Theme by Anders Norén